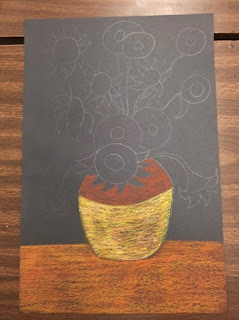
After reading "Camille and the Sunflowers - A story about Vincent Van Gogh" by Laurence Anholt, my kindergarten through fourth grade students began work on their very own sunflower pictures. The following are the steps they followed over 4 forty five minute class periods.
Day 1: Students listen to story and talk about Vincent Van Gogh. On 12" x 18" sheets of black construction paper, they used pencil to draw the table, vase, and flowers. Each of my four tables had an example drawn by me on black construction paper but with white oil pastel so the lines would show up.
Day 2: Using Crayola Pastels, we applied color to the table and vase. The following pictures show each step and color used along with specific instructions for each step.
Using vertical strokes only, apply brown to the table.
Remind students to apply pressure in a firm way, but not so hard that they cover the paper completely.
Using horizontal strokes only, apply orange to the table. This layer should be applied a bit more lightly than the brown layer.
Using horizontal strokes only, apply a light layer of yellow to the table. Students need to be reminded to only use horizontal strokes.
These three colors applied in this order - vertical/horizontal/horizontal - creates a texture for the table.
Next, students apply yellow to the BOTTOM of the vase
trying to follow the curvature of the line separating
the top and bottom of the vase.
After applying yellow, students go over the
same area lightly with brown.
The next step on the bottom of the vase is to apply a very light layer of white over the previous colors.
By the way, on my example above, I hadn't drawn the flowers in prior to applying the color. Students would need to draw in their flowers at the same time as the vase and table.
For the top of the vase, you start with a layer of brown,
firm but not too thick.
After the layer of brown,
lightly apply a layer of yellow.
Next, apply a light layer of white. At this point, I encouraged students to notice that they achieved different results by simply changing the order of the colors.
The last part of the vase is for students to lightly draw a blue line separating the top and bottom parts of the vase. I had "Vincent" written on the board in the style that Van Gogh used to sign his work. They were to try to write "Vincent" in that style. For kindergarten students, I drew in the line and wrote the word for them.
(In case you are wondering, yes, it did take a whole class period to apply color to the table and vase)
Day 3 - This is the day we begin working on the flowers. Below are step by step photos and colors used. The main thing about applying color to the flowers was for students to be very meticulous about HOW they applied the color. On the sunflowers with outstretched petals, they were to work from the center of the flower out to the tip. Now, that doesn't mean everyone did! The other thing was the order of the colors. We worked on building our colors through layers.
The flowers with the outstretched petals have a brown center.
Then you go over the brown with orange.
The petals are yellow - lightly applied.
Next, apply orange over the yellow.
Then apply white over the orange.
The round flowers have a light green center.
Next, go over the light green with dark green - lightly.
The flowers with the green center have orange around them. You start making small radiating marks around the green.
Continue to fill the entire circle with small marks radiating out from the center.
Take those marks all the way to the edge of your circle.
Next, lightly add in some yellow marks. You are not putting in nearly as many. Make sure they are radiating out from the center.
Finally, add a bit of white in the same way.
Do all of the round flowers in this way.
Students start the stems using light green.
Next, they add a bit of dark green.
Finally, they add a bit of brown.
This is my original demo. Because it was on construction paper and I was using it to teach 17 elementary classes, it started to get worn. I decided to coat the front with Mod-Podge to protect it. So in this photo it is a bit shiny and curling. If students had time, they could look to it for more details and colors to add to their work. Even though we spent four class periods on these, it would have been nice to have one more to fine tune them. Either way, the students were very proud of their work. I'm going to post all the grade level work in a different post. If you have any questions about the instructions, please let me know!


No comments:
Post a Comment